
Page 42 - the NOISE June 2016
P. 42
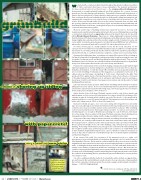
column 1: shoring up siding
We started with a common problem found throughout the greater Southwest: an artifact of 1980s construction that leaves a house vulnerable to the elements and destined for disease and destruction in less than 20 years — the compressed board siding panel — factory-made to resemble planked hardwood, but if left gutterless for a season, becomes ground zero for water damage and infestation. Particularly in Arizona, with intermissions of intense dry heat and periods of huge saturation during monsoon, rainwater splatters down from overhangs directly onto hardpacked earth, ricocheting up the siding; burrowing into and expanding the composite wood as only the fusion of moisture and hot desert heat can. The result is at first seen through visible stressors in the exterior latex paint; then over time, with the opening of minute air pockets in the layers of glue and sawdust, the board will warp and bend from the frame of the house, creating perfect space for such warmth-affiliate pests as the cockroach and termite, among others.
We knew another type of building material was required if we were to shore up both insulation and overall structural integrity, and turned to the lessons of Burning Man, researching a construction method known as papercrete (referenced in detail in the book, the Good Life Lab by Wendy Jehanara Tremayne). Papercrete is a simple, lightweight compound created from the mixture of Portland cement and shredded paper as the filler, instead of sand, the result being a highly dense substance that is fire resistant, weighs a tenth of standard concrete, and carries with it an insulative property equal to an industrial rating of R-10 (per inch of thickness, whereas the conventional “pink stuff ” is rated at R-2.5, and traditional brick, an R-.02).
In our line of work, paper is a readily available resource (for the record, only about 100-300 copies per run of 13,000 have been recycled this way this past year, in addition to our tidying up the shared racks of out of date periodicals), but the method could involve any fibrous pulp really, be it derived from hemp, or a synthetic material (as rastablock is a similar use for recycled styrofoam).
Preparing the building was time-consuming, as it required the removal of the old siding, in 6x4’ panels, along with its trademarked counterpart insulative board (measuring the same, and also made of composite wood), and the blown fiberglass pink insulation panels. Then, once the building was torn to its skeleton, we sealed the framewood and adjoining interior drywall with heavy coats of latex paint often found for sale on the cheap at the ReStore.
However, the real testament of time came from making our byproduct usable with the light industrial equipment we had the budget for (a hand-held concrete mixer for less than two benjamins at the Depot). So with the handy Office shredder and a year guaranteed warranty, we set on the shredding of redundancy of this magazine, an accumulative (over 8 years of 12 editions, when we first began a stockpiling) of 19,200 issues. Thank God for the kids! That produced (15) 50-gallon barrels of stacked material (too much of an archive!), or 30 barrels of shredded material with sufficient room to add water and Portland cement to and make a decent pour. In all, it took 20 barrels of wet papercrete to insulate and side the walls of a 14x24’ building with few windows.
Labor was intensive in this operation, with both the shredding and the mixing of one barrel taking an hour each to achieve. As one economist friend pointed out, if we were to pay the kids and ourselves $25 per barrel operation (the living wage, some may peg), the total cost in labor for the entire project would be $1000 on the nose.
Add to that the $9 per 50-lb bag of Portland cement it took for each of those barrels, and with the paper as a free resource, the total material cost came to about $380, including a $200 estimate on water & electricity, which is high in our neck of the woods. So the grand total in material and labor to cover 336 square feet with 41⁄2” thick papercrete (as both insulation and
“adobe style” siding) came to $1380, or about $4 a square foot.
Back at the rebuild, we gave a once-over seal to wiring with old garden hose and Gorilla tape, to be safe, although an electrician friend mentioned it was probably an unnecessary step, as the lines were in good condition and we cut the power before each pour. After everything seemed sealed and primed, we then began mixing our batch. To start, we used a barrel of shredded paper loose enough to fill with water, allowing it to soak for 48 hours, then mixed it to a fine sludge. Then we added a 50-lb bag of Portland cement per barrel, dividing it into manageable 5-gallon buckets, mixing until the sludge resembled brownie batter.
Using some of the same siding we had just removed, and adding some plastic tarp as lining on the inside, we created pockets between the studs and sealed interior walls, and slopped the wet papercrete in, a bucket at a time. Messy and wet, but really a good day of work, we’d fill one quarter the height of one side of the building a day, moving our pour around the building. Around day 5 in the Arizona sun, the papercrete on the first side of the building was dry enough for another pour, and we’d go around in such a manner as to slowly fill the walls to their maximum height buttressing the eaves, a process which we could now enumerate at about 20 days, but in reality took considerably longer due to weekend mayhem and familial and fraternal obligations.
As we removed the mold, the consistency of the papercrete took on a rather sci-fi attractiveness, its smooth and whitish coloring when dry giving it a feel of a model home on Luke Skywalker’s Tatooine. But to make it consistent with the other stucco homes around the neighborhood, there remained one more layer we would apply by hand, to cover the exposed studs. In hindsight, the best method may have been to cover the studs with chicken wire so another course mixture of papercrete would have something to stick to. But at the time, we opted for a layering method applied by masonry trowel, which when allowed slow curing time (in shady areas of the building), worked outstanding; but in high-intensity heat locations (like the southside of the building) dried so quick that the papercrete flaked like a croissant and has since begun to crack.
Our ode to caulking, and better methods of curing by the adobe method, as suggested by a pro, we’ll reveal in the next installment, as well as how to shore up a decades-old wavy asphalt- tile roof into a rainwater catchment system forecasted to supply a small backyard orchard for a lifetime ... Until then, happy grüning!
| Omar Victor is a chipper off the old block.
omar@thenoise.us
with papercrete!
story & photos by Omar Victor
Grünbuild is a project of Weavel Inc., made possible by Verde Valley Rentals and Volunteers S.Ohashi, S.Seiverd, M.Turner, U.&M. Gonzales & R.Reeves
42 • JUNE 2016 • the NOISE arts & news • thenoise.us
PROJEX
